Configuring dbt Core with Oracle Autonomous Database

Introduction
Dbt is a popular data transformation tool that is used to curate, enrich, aggregate, and analyze data in a data warehouse. With dbt, you write a modular, reusable SQL or Python models that implement required transformations and business logic. The models are automatically executed according to the dependencies in the code. The code may be version controlled, reviewed, tested, and documented by the tool. The principles upon which the dbt is founded are described in The dbt Viewpoint.
Dbt comes in two flavors. Dbt Core is an open-source tool that you install on compute infrastructure and use to design and run transformations. Dbt Cloud is a fully managed, paid SaaS service, in which you develop, test, run, schedule, and manage data pipelines using the web user interface or CLI. Dbt Cloud includes dbt Core and it has additional, value added features not available in the free version.
Dbt supports many data platforms via either trusted or community managed adapters. One of
the trusted adapters is dbt-oracle, which allows you to run transformations in Oracle
Autonomous Database, as well as in non-autonomous Oracle Databases. I was interested to
test how this adapter works with Oracle Autonomous Database 23ai. Currently, dbt-oracle
is available in dbt Core only. I hope it is only a matter of time before connectivity to
Oracle Autonomous Database is part of dbt Cloud as well.
This post describes the installation of dbt Core on VM compute instance in Oracle Cloud Infrastructure (OCI), the configuration of the dbt Core for connectivity with Oracle Autonomous Database 23ai (ADB), and testing sample models. Hopefully, one of the next post will provide more information on how to effectively use dbt with Oracle Database based data warehouse.
Why to use dbt?
There are many ETL tools that can work with Oracle Autonomous Database. Oracle Data Transforms is available as part of the ADB service. OCI Data Integration supports ADB as well as many other OCI services. There are many 3rd party ETL tools working with ADB. So why to consider dbt?
Based on my short experience with dbt Core, I believe that dbt is aimed at data engineers who prefer working with SQL code instead of GUI, who need 100% control over the code and who want to maintain the transformations in versioning tool like GitHub. For these data engineers, dbt provides a great framework for writing transformation code in SQL, orchestrating and executing the data pipelines, and applying tests on data.
Also, dbt enforces “ELT” approach and layered architecture (e.g., medallion architecture with Bronze, Silver, and Gold layers). In other words, dbt assumes that you load all source data into the Staging or Bronze layer as-is, and only after data lands in the data warehouse, transformations are applied.
Concept
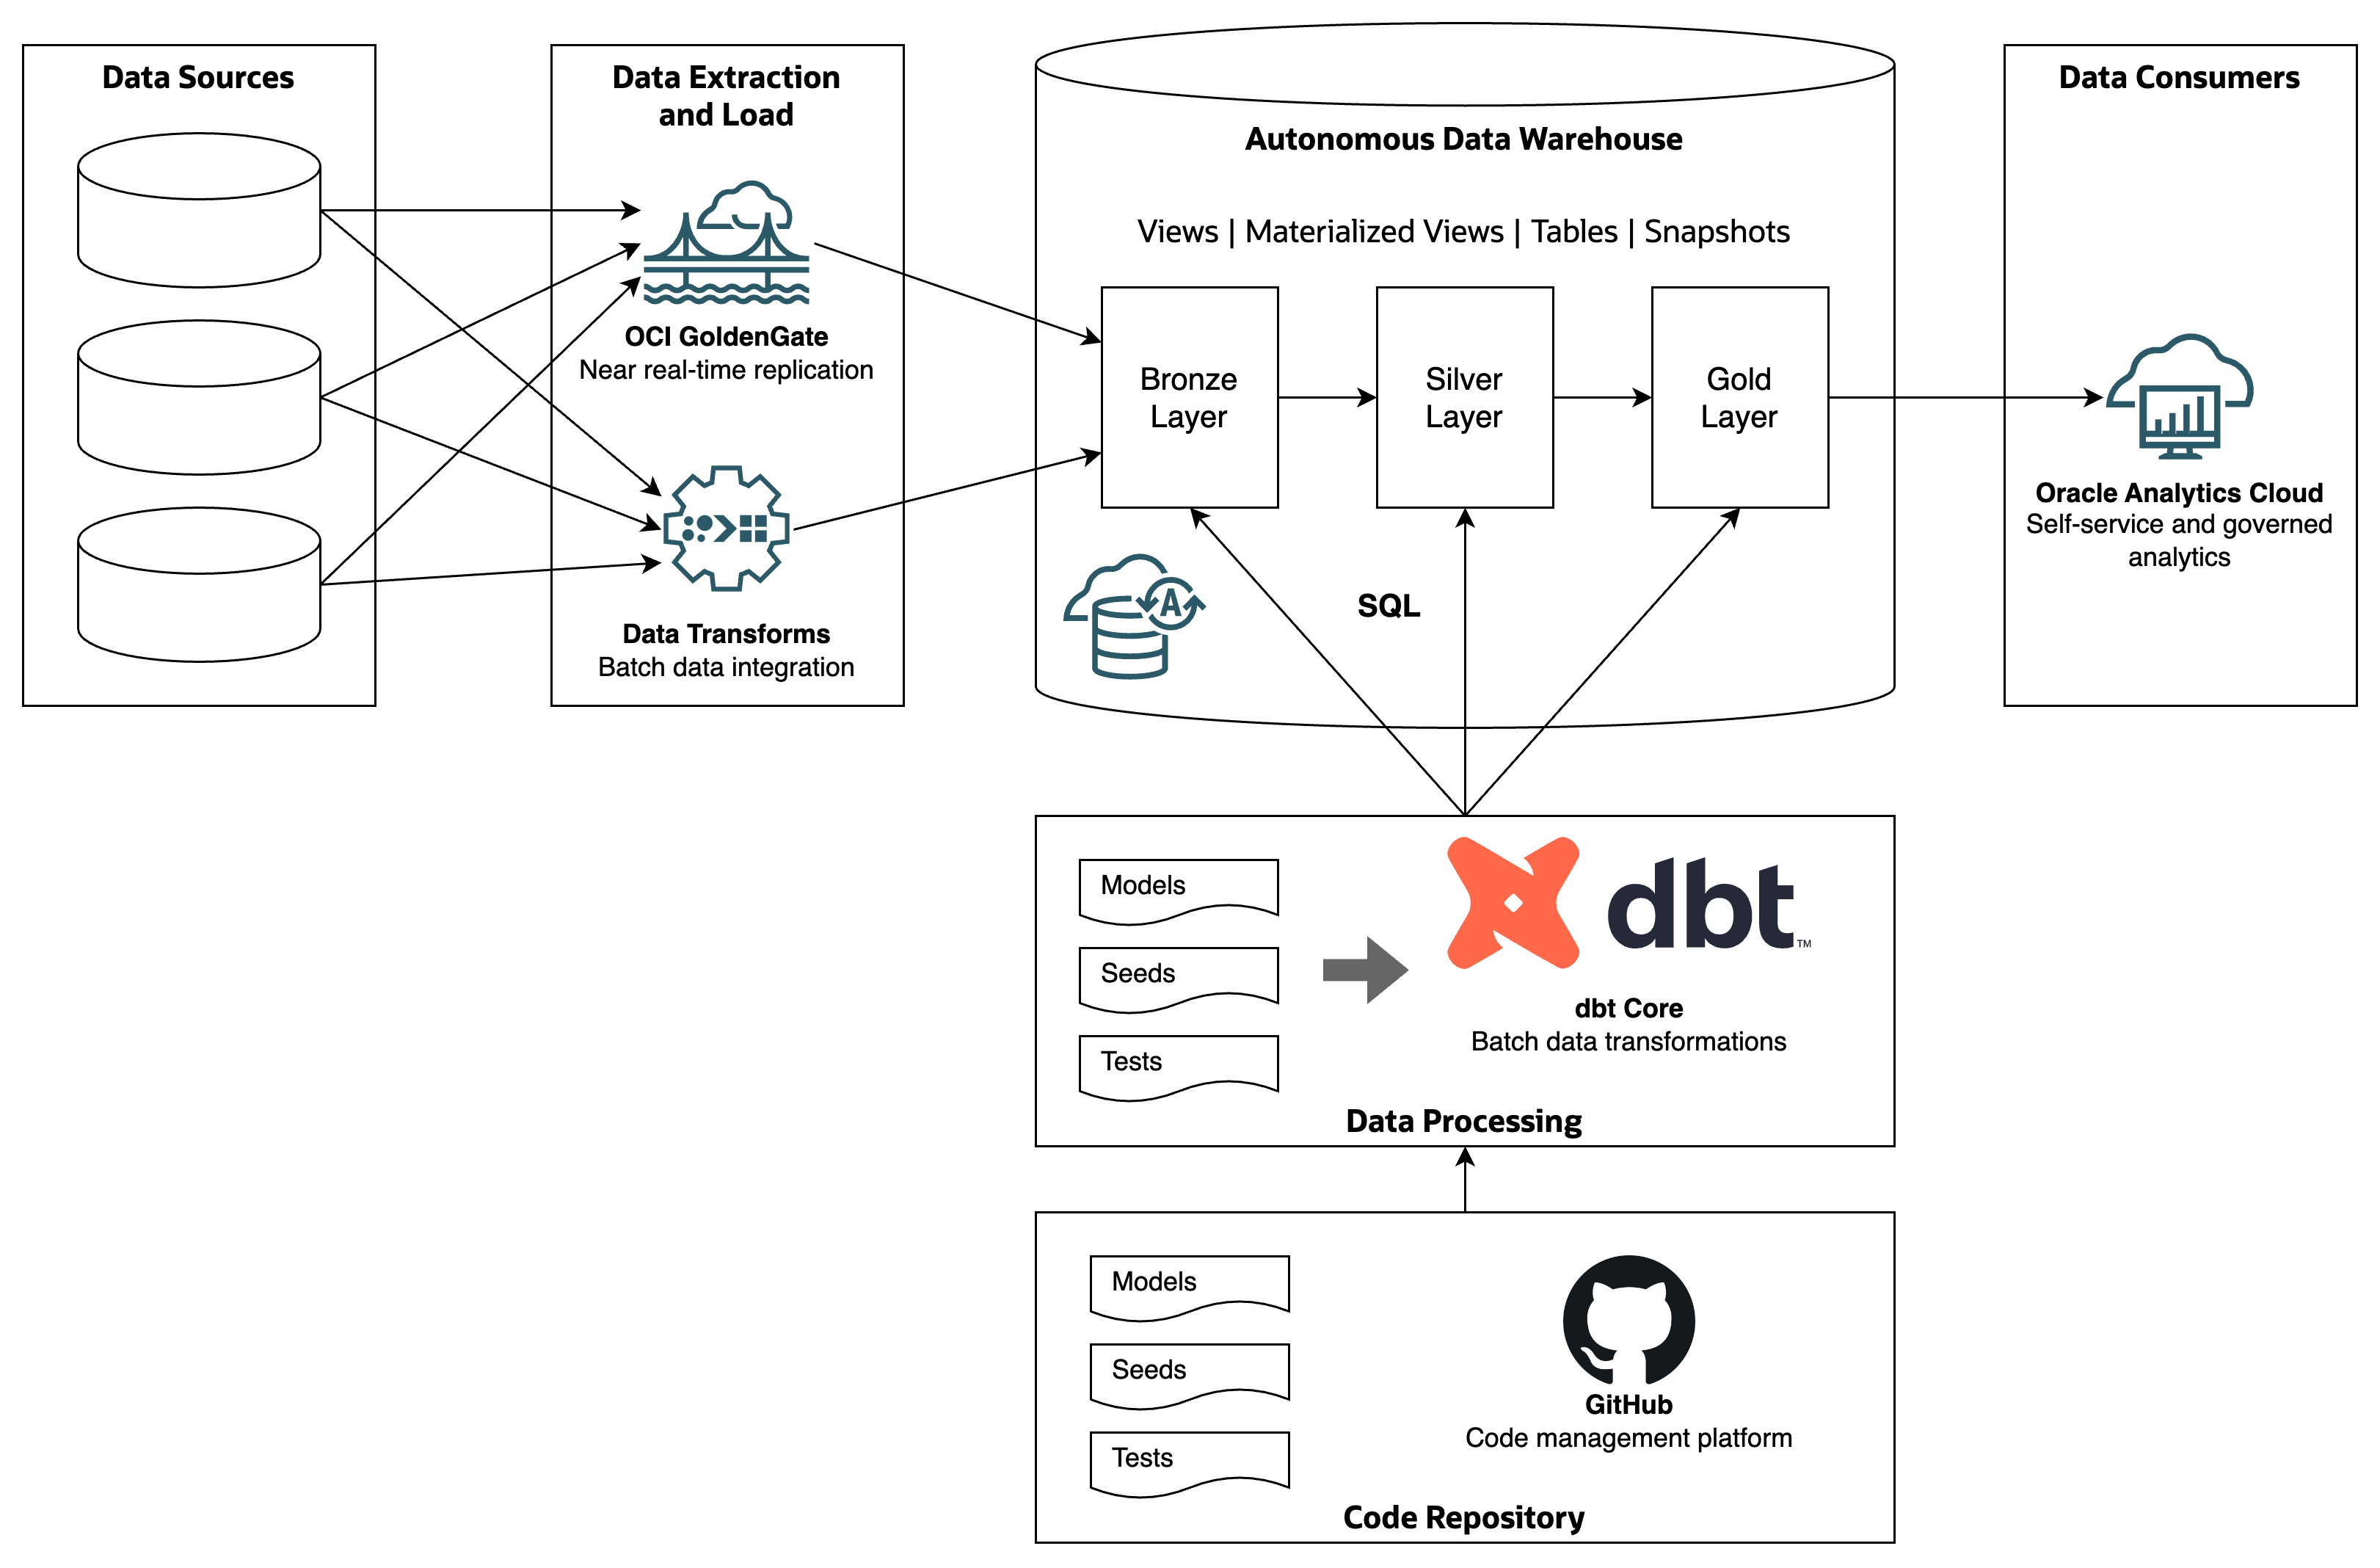
Dbt concept is simple. It is a data transformation tool that uses the database as a transformation engine. Dbt implements the data transformation pipeline by orchestrating and executing transformations steps defined as SQL commands.
-
Data Sources - databases, applications, APIs, data sets and other data sources.
-
Data Extraction and Load - technologies extracting data from sources and loading them to the Staging or Bronze layers of the data warehouse. Examples are OCI GoldenGate (near real-time replication) and Oracle Data Transforms (batch data integration).
-
Autonomous Data Warehouse - managed data warehouse platform. Source data is loaded in original structure into the Bronze layer. From the Bronze layer, it is curated, transformed, enriched and loaded into Silver and Gold layers for analytics and sharing.
-
Data Consumers - analytical and reporting tools, AI/ML platforms, and operational applications using data from the data warehouse. An example is Oracle Analytics Cloud.
-
dbt Core - data transformation tool which orchestrates and executes data transformation steps between Bronze, Silver, and Gold layers. The steps are defined as SQL commands in Models folder. Dbt looks at the dependencies in files, it creates a DAG, and it executes the commands according to the DAG.
-
Code Repository - Models and other dbt configuration files are maintained in a code repository such as GitHub.
Configuration
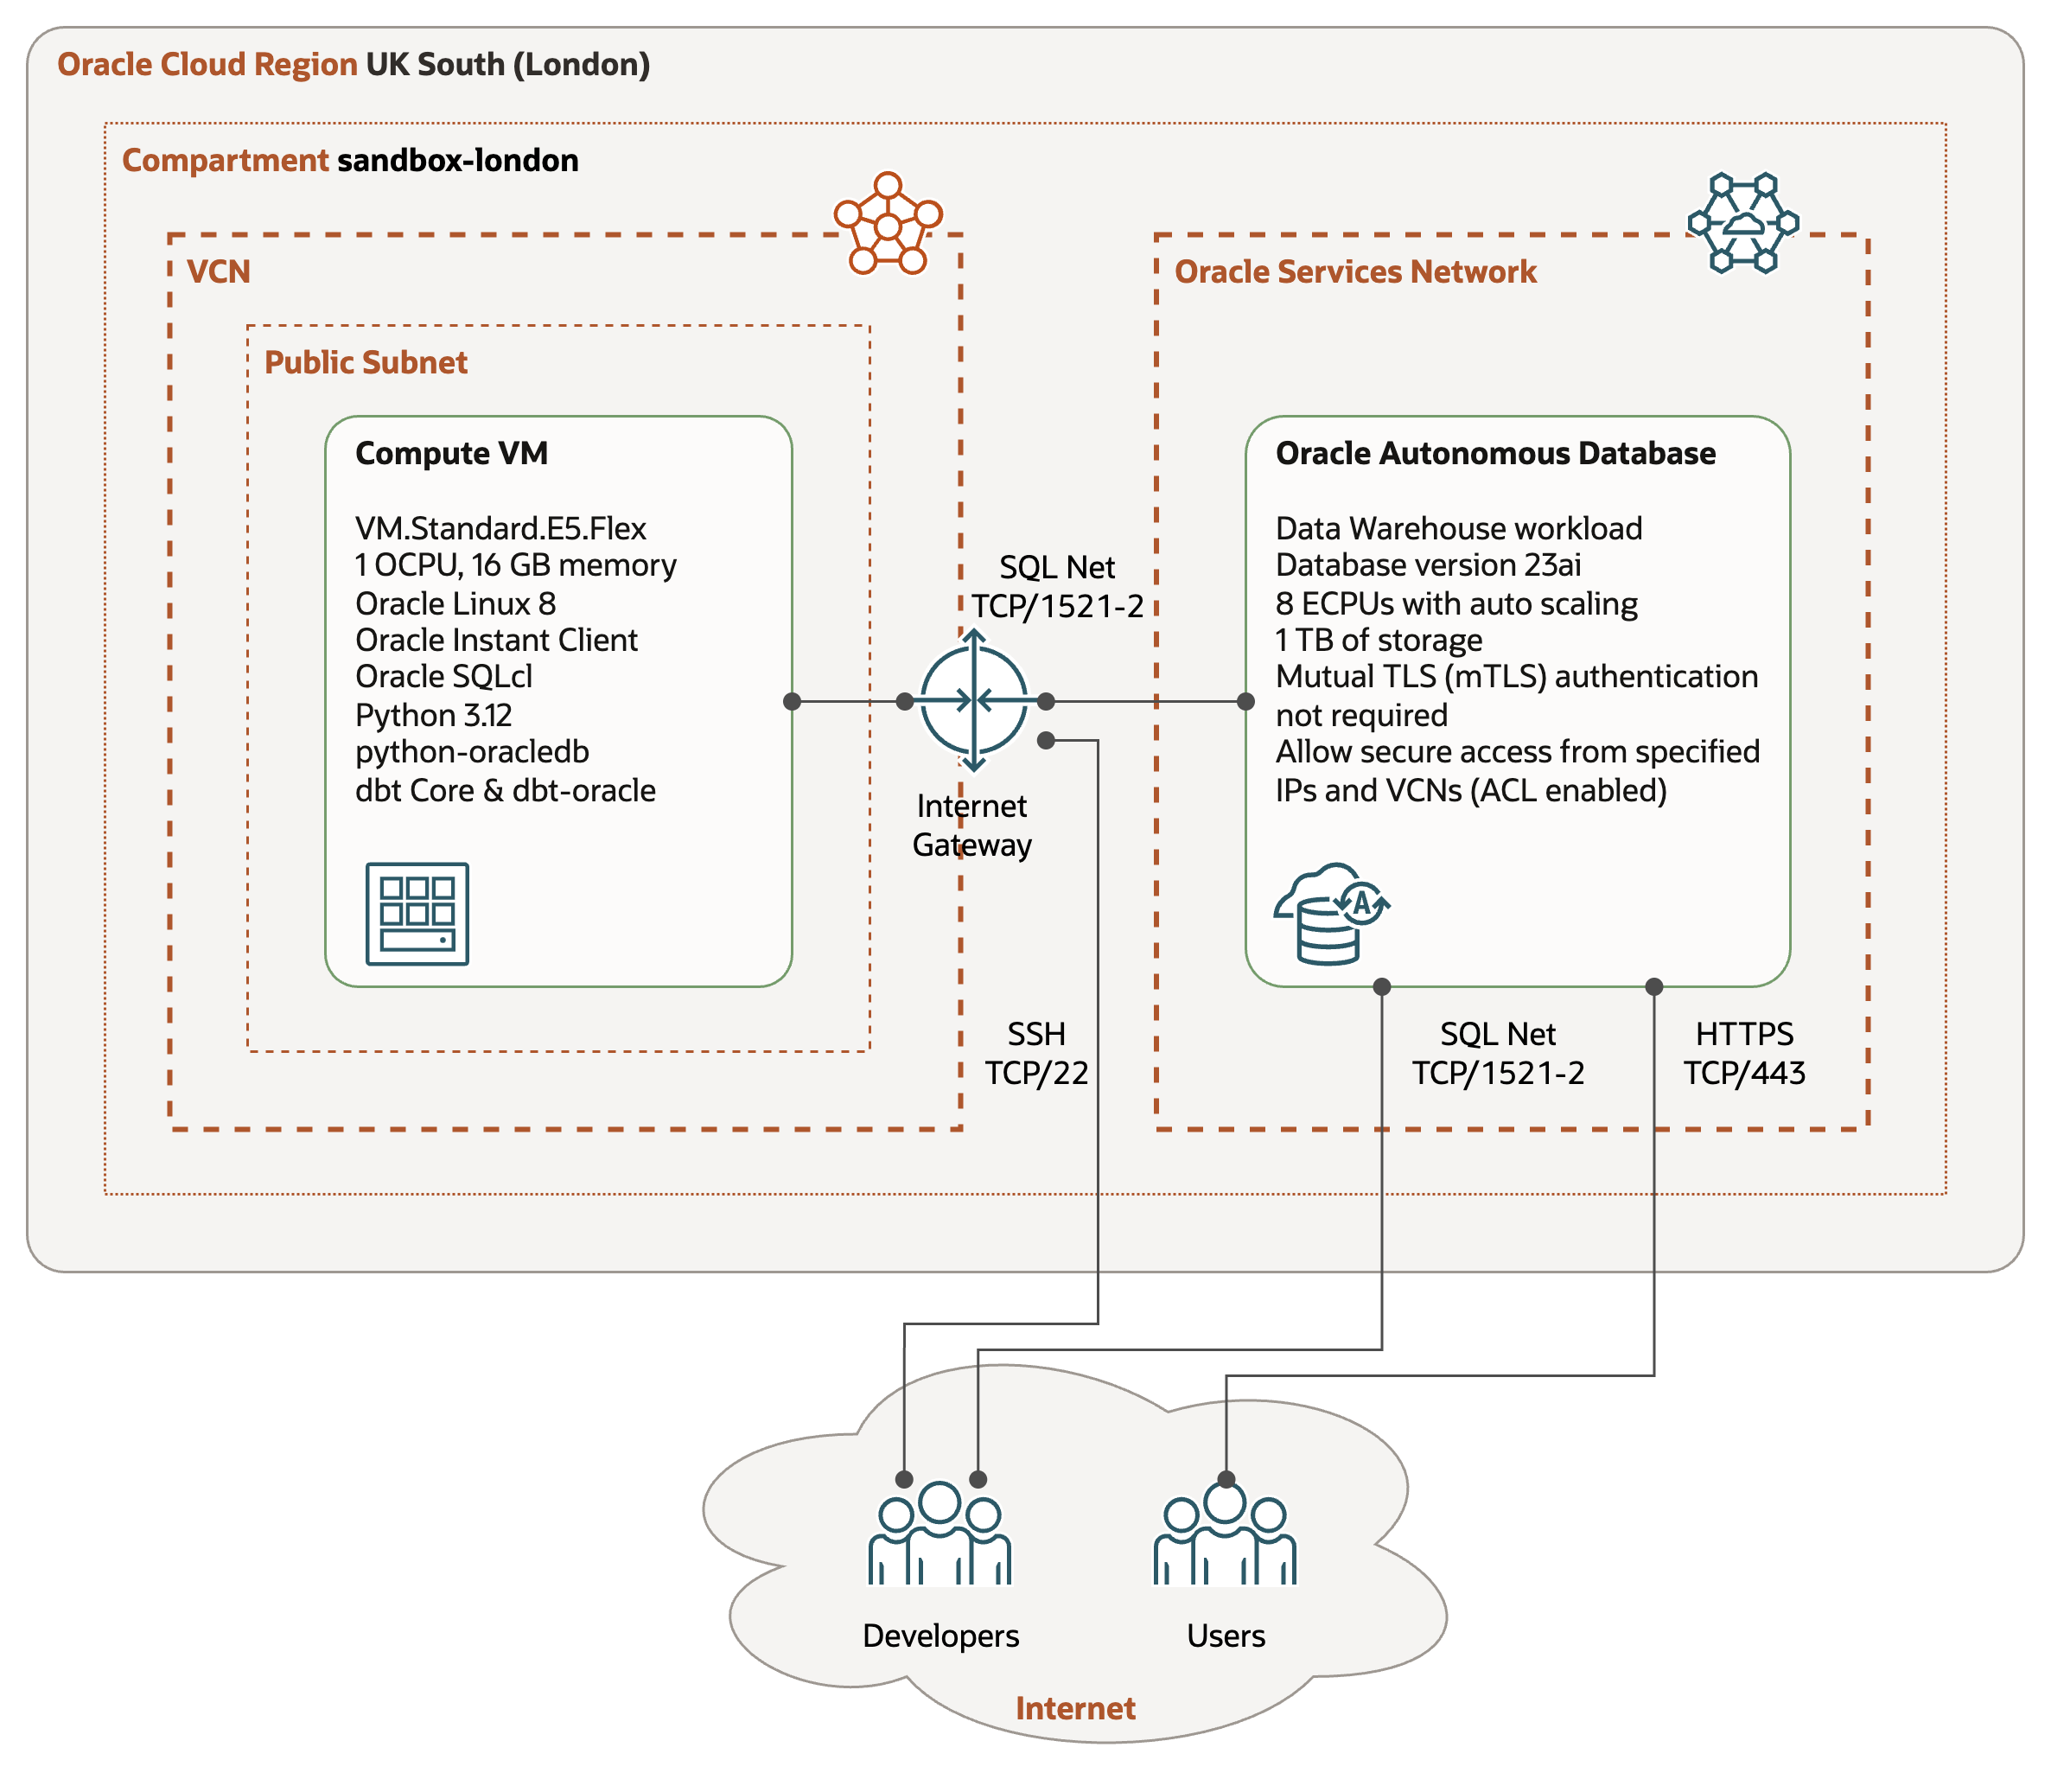
I tested the installation of dbt Core with the following configuration.
-
Compute VM - VM.Standard.E5.Flex shape with 1 OCPUs and 16 GB of memory, and running Oracle Linux 8. The VM is placed in a public subnet. Note that platform image with Oracle Linux 8 is preinstalled with Python 3.6.
-
Autonomous Data Warehouse Serverless with Oracle Database 23ai - shape with 8 ECPUs and Autoscaling enabled. For the simplicity, the database is accessible from Internet, from hosts in the Access Control List (ACL).
-
Connectivity - Compute VM accesses Autonomous Data Warehouse over SQL Net, using port 1522 (mTLS) and port 1521 (TLS). The traffic is routed over Internet Gateway.
-
Software - in addition to dbt Core, I also wanted to install Oracle SQLcl for creating schema and source tables and to validate results of transformations, and OCI CLI for interacting with Oracle Cloud Infrastructure services.
Installation
System Packages
After the Compute VM is provisioned with the Oracle Linux 8 platform image, I installed the following system packages:
-
Oracle Instant Client - the latest version of libraries that provide the necessary network connectivity and data features to connect and use Oracle Database with thick clients.
-
Python 3.12 - the minimum version of Python required by dbt Core is Python 3.9. I installed Python 3.12, as this is the latest version supported with the latest version of dbt Core (1.9).
-
Git - the latest version of Git tools. I installed all the packages, but only the main components are needed.
-
Java OpenJDK 23 - Java environment is required for SQLcl; it is not needed by dbt Core. I installed JDK 23 headless, which is currently the GA version.
-
Oracle SQLcl - the latest version of SQL command line for Oracle Database. Note this software is used to run arbitrary SQL commands; it is not needed by dbt Core.
-
Oracle Linux 8 (x86_64) Development - Packages for test and development. This module is a prerequisite for OCI CLI; it is not needed by dbt Core.
-
OCI CLI - command line interface for Oracle Cloud Infrastructure to interact with OCI programmatically. It is not needed by dbt Core.
$ sudo dnf install oracle-instantclient-release-23ai-el8
$ sudo dnf install oracle-instantclient-basic
$ sudo dnf install python312
$ sudo dnf install git-all
$ sudo dnf install jdk-23-headless
$ sudo dnf install sqlcl
$ sudo dnf install oraclelinux-developer-release-el8
$ sudo dnf install python36-oci-cli
Python Packages
I followed Install dbt with pip documentation for configuring Python environment and installing dbt Core. In addition to dbt Core, I also installed OCI CLI and Python SDK for working with Oracle Cloud services.
-
Create and activate Python Virtual Environment - the dbt documentation recommends working within Python virtual environment, to isolate dbt Python dependencies from other tools using Python.
-
Upgrade Pip - as a good practice, make sure the Pip tool is upgraded to the latest version.
-
Install Oracle libraries for Python - the Python module
python-oracledbis required by dbt Core to connect to Oracle Database. It can work either in thin mode, without Oracle Instant Client, or in the thick mode, when Oracle Instant Client is needed. -
Install dbt Core and dbt connector for Oracle - this step installs the latest version of
dbt-coreanddbt-oraclemodules. Note the version installed is 1.9.1 fordbt-coreand 1.9.0 fordbt-oracle. -
Install OCI CLI - this step installs Python SDK for interacting with Oracle Cloud Infrastructure APIs. The step is optional, as dbt does not need OCI Python SDK.
$ python3.12 -m venv dbt-env
$ source dbt-env/bin/activate
$ python -m pip install --upgrade pip
$ python -m pip install oracledb
$ python -m pip install dbt-core dbt-oracle
$ python -m pip install oci
Oracle User
Dbt connects to Oracle Database as a user specified in the configuration file. In the
Autonomous Database, the best practice is to use different user than ADMIN, which should
be used for database administration only. The dbt user must be granted privileges to
create objects in the target schema, as well as select from source tables or views.
The following script creates a user DBT, with privileges to create objects in its own
schema and to select data from the source table in the schema JSON_DATA.
create user DBT
identified by <password>
quota unlimited on data;

grant create session to DBT;
grant create table to DBT;
grant create view to DBT;
grant create materialized view to DBT;
grant create sequence to DBT;
grant create procedure to DBT;
grant dwrole to DBT;

grant select on JSON_DATA.INVOICE_COLLECTION to DBT;
Setup Connection
Dbt Core maintains connections in the ~/.dbt/profiles.yml file. After installing dbt
Core, create this file to test connection to Oracle Database.
I tested two types of connections, roughly following the setup described in Install dbt-oracle.
-
TLS connection with Thin driver. This is the most simple setup, as you do not need wallet and Oracle Instant Client. Note that TLS connection requires either private endpoint or ACL on the Autonomous Database side.
-
Mutual TLS (mTLS) connection with Thick driver. This setup is more secure, as the connection is protected by security credentials (wallet). With mTLS you can connect to Autonomous Database that allows access from everywhere.
Service and Threads
When defining the connection, you need to choose the database service and specify number of threads. Both parameters have significant impact on the performance and throughout of data transformations.
-
Database Service. Autonomous Data Warehouse provides 3 predefined services you can choose from (HIGH, MEDIUM, LOW). These services define degree of parallelism of individual statements, and maximum number of statements that can run concurrently (before queuing). See Database Service Names for details on degree of parallelism and concurrency. In
profiles.yml, database service is reflected in parametersserviceortns_name, depending on how you connect to the database. -
Threads. For dbt Core, parameter
threadsspecifies how many dbt models may be executed at the same time. Since executing the dbt model means running SQL statement defined by the model, this parameter should be equal or lower than maximum number of concurrent sessions available for the selected database service.
For example, if you use HIGH database service and the Auto Scaling in Autonomous Database
is enabled, the maximum number of concurrent statements is 9. Therefore, the parameter
threads should not be higher than 9. Note that if the threads is higher than maximum
number of concurrent statements, the statements will be queued by the database.
As many data transformation jobs require a lot of resources and high degree of
parallelism, I recommend using HIGH service as default. However, if you have large number
of small models (based on data volumes and complexity), you might want to use MEDIUM (or
even LOW) service and increase the parameter threads for higher concurrency.
TLS connection with Thin driver
Connection String
Connection information is available in the Autonomous Database Console, in the Database
Connection tab. Do not forget to select TLS as TLS Authentication. Choose the service
(High, Medium, Low) appropriate for your use case.
(description= (retry_count=20)(retry_delay=3)(address=(protocol=tcps)(port=1521)(host=adb.uk-london-1.oraclecloud.com))
(connect_data=(service_name=<service_name>.adb.oraclecloud.com))(security=(ssl_server_dn_match=yes)))
Environment Variables
Map the connection parameters to the environment variables, as demonstrated below.
export DBT_ORACLE_USER=DBT
export DBT_ORACLE_PASSWORD=<password>
export DBT_ORACLE_SCHEMA=DBT
export DBT_ORACLE_HOST=adb.uk-london-1.oraclecloud.com
export DBT_ORACLE_SERVICE=<service_name>.adb.oraclecloud.com
export DBT_ORACLE_PROTOCOL=tcps
export DBT_ORACLE_PORT=1521
export DBT_ORACLE_DATABASE=<db_name>
export DBT_ORACLE_OML_URL=https://<db_name>.adb.uk-london-1.oraclecloudapps.com
export DBT_ORACLE_THREADS=3
export ORA_PYTHON_DRIVER_TYPE=thin
- DBT_ORACLE_USER - user used by dbt to connect to the database, such as
DBT. - DBT_ORACLE_PASSWORD - password of the database user.
- DBT_ORACLE_SCHEMA - name of the target schema, in our case same as dbt user.
- DBT_ORACLE_HOST - value of field
hostin the connection string. Same for all autonomous databases in the region. - DBT_ORACLE_SERVICE - value of field
service_namein the connection string. - DBT_ORACLE_PROTOCOL - value
tcpsis required. - DBT_ORACLE_PORT - port
1521is required for TLS connection. - DBT_ORACLE_DATABASE - run command
select SYS_CONTEXT('userenv', 'DB_NAME')to get this value. - DBT_ORACLE_OML_URL - use URL from Tool Configuration -> Oracle Machine Learning user interface.
- DBT_ORACLE_THREADS - maximum number of concurrent connections to the database.
- ORA_PYTHON_DRIVER_TYPE - value
thinis required for Thin driver.
Connection Profile
The parameters in ~/.dbt/profiles.yml file are substituted by environment variables as follows:
dbt_tls:
  outputs:
    dev:
      type: oracle
      database: '{{ env_var(''DBT_ORACLE_DATABASE'') }}'
      host: '{{ env_var(''DBT_ORACLE_HOST'') }}'
      password: '{{ env_var(''DBT_ORACLE_PASSWORD'') }}'
      port: '{{ env_var(''DBT_ORACLE_PORT'') }}'
      protocol: '{{ env_var(''DBT_ORACLE_PROTOCOL'') }}'
      schema: '{{ env_var(''DBT_ORACLE_SCHEMA'') }}'
      service: '{{ env_var(''DBT_ORACLE_SERVICE'') }}'
      user: '{{ env_var(''DBT_ORACLE_USER'') }}'
      oml_cloud_service_url: '{{ env_var(''DBT_ORACLE_OML_URL'') }}'
      threads: '{{ env_var(''DBT_ORACLE_THREADS'') | int}}'
  target: dev
Connection Test
Once the connection profile is set, you can test the connection via dbt debug.
$ dbt --profile tls debug
14:27:27  Running with dbt=1.9.1
14:27:27  dbt version: 1.9.1
14:27:27  python version: 3.12.8
14:27:27  python path: /home/opc/dbt-env/bin/python
14:27:27  os info: Linux-5.15.0-302.167.6.el8uek.x86_64-x86_64-with-glibc2.28
14:27:27  oracle adapter: Running in thin mode
14:27:27  Using profiles dir at /home/opc/.dbt
14:27:27  Using profiles.yml file at /home/opc/.dbt/profiles.yml
14:27:27  Using dbt_project.yml file at /home/opc/dbt/dbt_project.yml
14:27:27  adapter type: oracle
14:27:27  adapter version: 1.9.0
14:27:27  Configuration:
14:27:27    profiles.yml file [OK found and valid]
14:27:27    dbt_project.yml file [ERROR not found]
14:27:27  Required dependencies:
14:27:27   - git [OK found]

14:27:27  Connection:
14:27:27    user: DBT
14:27:27    database: <db_name>
14:27:27    schema: DBT
14:27:27    protocol: tcps
14:27:27    host: adb.uk-london-1.oraclecloud.com
14:27:27    port: 1521
14:27:27    tns_name: None
14:27:27    service: <service_name>.adb.oraclecloud.com
14:27:27    connection_string: None
14:27:27    shardingkey: []
14:27:27    supershardingkey: []
14:27:27    cclass: None
14:27:27    purity: None
14:27:27    retry_count: 1
14:27:27    retry_delay: 3
14:27:27    oml_cloud_service_url: https://<db_name>.adb.uk-london-1.oraclecloudapps.com
14:27:27    session_info: {}
14:27:27  Registered adapter: oracle=1.9.0
14:27:27    Connection test: [OK connection ok]

14:27:27  1 check failed:
14:27:27  Project loading failed for the following reason:
 project path </home/opc/dbt/dbt_project.yml> not found
The message Connection test: [OK connection ok] means the connection was successfully
established.] The error dbt_project.yml file [ERROR not found] is expected, because
immediately after the installation there is no dbt project.
Mutual TLS (mTLS) connection with Thick driver
Download Wallet
The wallet may be downloaded from the Autonomous Database Console, from the Database Connection tab. Alternatively, you can use OCI CLI to download the wallet directly to the Compute VM and unzip it.
$ mkdir /home/opc/.oracle
$ chmod 700 /home/opc/.oracle
$ cd /home/opc/.oracle

$ oci db autonomous-database generate-wallet \
--autonomous-database-id <autonomous_database_ocid> \
--file <file_name>.zip \
--password <wallet_password> \
--generate-type SINGLE
Downloading file  [####################################]  100%

$ unzip <file_name>.zip
Archive:  <file_name>.zip
  inflating: ewallet.pem
  inflating: README
  inflating: cwallet.sso
  inflating: tnsnames.ora
  inflating: truststore.jks
  inflating: ojdbc.properties
  inflating: sqlnet.ora
  inflating: ewallet.p12
  inflating: keystore.jks
Before you can use the wallet, it is necessary to modify the sqlnet.ora file and update
the wallet location.
WALLET_LOCATION = (SOURCE = (METHOD = file) (METHOD_DATA = (DIRECTORY="/home/opc/.oracle")))
SSL_SERVER_DN_MATCH=yes
Environment Variables
Define the environment variables as follows:
export WALLET_LOCATION=/home/opc/.oracle
export WALLET_PASSWORD=<wallet_password>
export TNS_ADMIN=/home/opc/.oracle
export DBT_ORACLE_USER=DBT
export DBT_ORACLE_PASSWORD=<password>
export DBT_ORACLE_SCHEMA=DBT
export DBT_ORACLE_DATABASE=<db_name>
export DBT_ORACLE_TNS_NAME=<connection>
export DBT_ORACLE_OML_URL=https://<db_name>.adb.uk-london-1.oraclecloudapps.com
export DBT_ORACLE_THREADS=3
export ORA_PYTHON_DRIVER_TYPE=thick
- WALLET_LOCATION - directory with the wallet.
- WALLET_PASSWORD - wallet password.
- TNS_ADMIN - directory with SQL Net configuration files
tnsnames.oraandsqlnet.ora. - DBT_ORACLE_USER - user used by dbt to connect to the database, such as
DBT. - DBT_ORACLE_PASSWORD - password of the database user.
- DBT_ORACLE_SCHEMA - name of the target schema, in our case same as dbt user.
- DBT_ORACLE_DATABASE - run command
select SYS_CONTEXT('userenv', 'DB_NAME')to get this value. - DBT_ORACLE_TNS_NAME - entry from
tnsnames.oraspecifying the connection. - DBT_ORACLE_OML_URL - use URL from Tool Configuration -> Oracle Machine Learning user interface.
- DBT_ORACLE_THREADS - maximum number of concurrent connections to the database.
- ORA_PYTHON_DRIVER_TYPE - value
thickis required for Thick driver.
Connection Profile
The parameters in ~/.dbt/profiles.yml file are substituted by environment variables as follows:
dbt_mtls:
  outputs:
    dev:
      type: oracle
      user: '{{ env_var('DBT_ORACLE_USER') }}'
      password: '{{ env_var('DBT_ORACLE_PASSWORD') }}'
      database: '{{ env_var('DBT_ORACLE_DATABASE') }}'
      tns_name: '{{ env_var('DBT_ORACLE_TNS_NAME') }}'
      schema: '{{ env_var('DBT_ORACLE_SCHEMA') }}'
      oml_cloud_service_url: '{{ env_var(''DBT_ORACLE_OML_URL'') }}'
      threads: '{{ env_var(''DBT_ORACLE_THREADS'') | int}}'
  target: dev
Connection Test
$ dbt --profile dbt_mtls debug
13:05:35  Running with dbt=1.9.1
13:05:35  dbt version: 1.9.1
13:05:35  python version: 3.12.8
13:05:35  python path: /home/opc/dbt-env/bin/python
13:05:35  os info: Linux-5.15.0-302.167.6.el8uek.x86_64-x86_64-with-glibc2.28
13:05:35  oracle adapter: Running in thick mode
13:05:35  Using profiles dir at /home/opc/.dbt
13:05:35  Using profiles.yml file at /home/opc/.dbt/profiles.yml
13:05:35  Using dbt_project.yml file at /home/opc/dbt_project.yml
13:05:35  adapter type: oracle
13:05:35  adapter version: 1.9.0
13:05:35  Configuration:
13:05:35    profiles.yml file [OK found and valid]
13:05:35    dbt_project.yml file [ERROR not found]
13:05:35  Required dependencies:
13:05:35   - git [OK found]

13:05:35  Connection:
13:05:35    user: DBT
13:05:35    database: <db_name>
13:05:35    schema: DBT
13:05:35    protocol: None
13:05:35    host: None
13:05:35    port: None
13:05:35    tns_name: jakubadw23_high
13:05:35    service: None
13:05:35    connection_string: None
13:05:35    shardingkey: []
13:05:35    supershardingkey: []
13:05:35    cclass: None
13:05:35    purity: None
13:05:35    retry_count: 1
13:05:35    retry_delay: 3
13:05:35    oml_cloud_service_url: https://<db_name>.adb.uk-london-1.oraclecloudapps.com
13:05:35    session_info: {}
13:05:35  Registered adapter: oracle=1.9.0
13:05:35    Connection test: [OK connection ok]

13:05:35  1 check failed:
13:05:35  Project loading failed for the following reason:
 project path </home/opc/dbt_project.yml> not found
The connection was successfully established. You can see that the driver uses Thick mode, unlike in the previous setup.
Sample Project
Create Project
I created sample dbt Core project by running dbt init command.
$ dbt init my_dbt_project
The command creates the following:
- New directory with the same name as project,
my_dbt_projectin my case. - Project sub-directories like
models,seeds,testsand others. - Project configuration file
dbt_project.yml. - Sample models in the
models/examplesub-directory. - New entry in the profile file
~/.dbt/profiles.ymlseeded with data you entered when runningdbt init.
After creating the project, I recommend reviewing the connection parameters in
~/.dbt/profiles.yml, adding the parameter for database (which is missing in the
profile) and testing the connection. You might also want to delete the example models, so
that you do not have to exclude them every time you run the project.
Define Models
I used sample data and transformation logic from my previous post Loading and Analysis of Large and Complex JSON Documents.
Model Creating View
The first model invoice_lines_v.sql creates a view INVOICE_LINES_V transforming JSON
collection table into relational structure.
{{ config( materialized="view") }}

with invoice_lines as (
   select
      r.document_date                                                                        as document_date,
      json_value(r.data,'$._id' returning varchar2(40))                                      as record_id,
      to_timestamp(json_value(r.data,'$.inserted_timestamp'),'YYYY-MM-DD"T"HH24:MI:SS.FF3')  as inserted_timestamp,
      json_value(r.data,'$.document_body.detail.document_id' returning varchar2(40))         as document_id,
      json_value(r.data,'$.document_body.detail.invoice_number' returning varchar2(20))      as invoice_number,
      json_value(r.data,'$.document_body.detail.purchase_order' returning varchar2(20))      as purchase_order,
      json_value(r.data,'$.document_body.detail.contract_number' returning varchar2(20))     as contract_number,
      json_value(r.data,'$.document_body.detail.currency_code'returning varchar2(3))         as currency_iso_code,
      to_date(json_value(r.data,'$.document_body.detail.invoice_date'),'YYYY-MM-DD')         as invoice_date,
      to_date(json_value(r.data,'$.document_body.detail.due_date'),'YYYY-MM-DD')             as due_date,
      json_value(r.data,'$.document_body.customer.customer_number' returning varchar2(20))   as customer_number,
      json_value(r.data,'$.document_body.customer.name' returning varchar2(200))             as customer_name,
      r_lines.*
   from json_data.invoice_collection r,
      json_table(r.data,'$.document_body.lines[*]' columns (
         line_number          number        path '$.line_number',
         line_product_code    varchar2(20)  path '$.product_code',
         line_product_desc    varchar2(200) path '$.product_desc',
         line_quantity        number        path '$.quantity',
         line_unit_price      number        path '$.unit_price',
         line_base_amount     number        path '$.base_amount',
         line_discount_pct    number        path '$.discount_pct',
         line_discount_amount number        path '$.discount_amount',
         line_tax_code        varchar2(20)  path '$.tax_code',
         line_tax_pct         number        path '$.tax_pct',
         line_tax_amount      number        path '$.tax_amount',
         line_net_amount      number        path '$.net_amount',
         line_comment         varchar2(400) path '$.comment'
      )) r_lines
)
select
   document_date,
   record_id,
   inserted_timestamp,
   document_id,
   invoice_number,
   purchase_order,
   contract_number,
   currency_iso_code,
   invoice_date,
   due_date,
   customer_number,
   customer_name,
   line_number,
   line_product_code,
   line_product_desc,
   line_quantity,
   line_unit_price,
   line_base_amount,
   line_discount_pct,
   line_discount_amount,
   line_tax_code,
   line_tax_pct,
   line_tax_amount,
   line_net_amount,
   line_comment
from
   invoice_lines
Model Creating Table
The second model invoice_lines_agg_t.sql uses the view defined in the previous model to
aggregate data and materialize them in a table INVOICE_LINES_AGG_T.
{{ config( materialized="table") }}

with invoice_lines_agg as (
   select
      customer_number                as customer_number,
      substr(customer_name,1,80)     as customer_name,
      substr(line_product_code,1,3)  as product_category,
      document_date                  as document_date,
      sum(line_base_amount)          as base_amount,
      sum(line_discount_amount)      as discount_amount,
      sum(line_tax_amount)           as tax_amount,
      sum(line_net_amount)           as net_amount
   from
      {{ ref("invoice_lines_v") }}
   group by
      customer_number,
      customer_name,
      product_category,
      document_date
)
select
   customer_number,
   customer_name,
   product_category,
   document_date,
   base_amount,
   discount_amount,
   tax_amount,
   net_amount
from
   invoice_lines_agg
Run Project
After creating the project, testing connection, and defining modules, I executed the
project using dbt run command.
$ dbt run
11:00:35  Running with dbt=1.9.1
11:00:35  oracle adapter: Running in thin mode
11:00:35  Registered adapter: oracle=1.9.0
11:00:36  Found 2 models, 482 macros
11:00:36
11:00:36  Concurrency: 3 threads (target='dev')
11:00:36
11:00:43  1 of 2 START sql view model DBT.invoice_lines_v ................................ [RUN]
11:00:43  1 of 2 OK created sql view model DBT.invoice_lines_v ........................... [OK in 0.28s]
11:00:43  2 of 2 START sql table model DBT.invoice_lines_agg_t ........................... [RUN]
11:06:08  2 of 2 OK created sql table model DBT.invoice_lines_agg_t ...................... [OK in 324.96s]
11:06:09
11:06:09  Finished running 1 table model, 1 view model in 0 hours 5 minutes and 32.58 seconds (332.58s).
11:06:09
11:06:09  Completed successfully
11:06:09
11:06:09  Done. PASS=2 WARN=0 ERROR=0 SKIP=0 TOTAL=2
Resources
- Introduction to dbt: What is dbt.
- The dbt approach and principles: The dbt Viewpoint.
- Installing dbt Core on compute instance: Install dbt with pip.
- Installing and configuring connectivity to Oracle Autonomous Database: Install dbt-oracle.
- Installing Python Driver for Oracle Database: Installing python-oracledb.
- Predefined database service for Autonomous Database: Database Service Names.